Learn the benefits of using metal raised garden beds and how easy it is to assemble an OLLE metal raised garden bed kit.
How to put together a metal raised garden bed kit
Metal raised garden beds are long-lasting, easy to maintain, and look neat and tidy in your garden.
After decades of gardening experience, I've learned that using raised garden beds is so much more productive for me than growing in the ground.
This post is sponsored by OLLEgardens.com
and contains affiliate links, which means if you click on a link and make a purchase I might earn a small commission, but it doesn't affect the price you pay. Read my disclosure here for more info.
The kind folks at OLLEgardens.com reached out and asked me to show you how easy it is to put together one of their metal raised bed garden kits. I was happy to say yes, since so many of my gardening friends are, like me, not as young as we used to be.
No power tools are required to build one of these kits, and the 17" depth means less stooping and leaning over while planting and weeding the garden.
What is a raised garden bed?
Raised garden beds are exactly that: large, bottomless planting containers that sit on the ground and raise the level of the soil you'll be planting in.
These "containers" can be made in just about any size and shape, as well as depth. The taller the container, the easier it is to reach your plants and maintain your garden.
There are many benefits of using raised garden beds. As mentioned, the height of the bed is a real advantage, especially for older gardeners. You won't need to bend over as far, and you may even be able to garden while sitting in a chair.
Because you don't step inside the raised garden bed, you'll want to be sure you can reach into the middle of the bed to plant and weed.
Even more advantages to using raised garden beds
- You can fill the planting bed with great soil, instead of putting up with the existing soil in your yard, which is often compacted and poor.
- A tall raised garden bed will also help to deter garden pests such as rabbits (and my dog, who likes to roll in the soil and dig holes in my garden).
- There is no need to till the soil in your raised bed each spring. The soil settles a little each year, so you simply top it off with more great soil and compost, which is full of nutrients.
- Raised garden beds drain well, so your plants won't be water-logged. And because they drain well, the soil will warm up faster in the spring, so you can start gardening earlier!
The benefits of metal raised garden beds vs. wood
Perhaps you're debating about building your raised garden beds with wood, or investing in metal raised beds.
There are a few things to consider. Let's compare wooden raised garden beds to an OLLE metal raised garden bed kit.
Building raised garden beds with wood will probably require the use of power tools. Not everyone has access to power tools, and still other gardeners aren't comfortable using them.
And in the past couple of years, the price of lumber has skyrocketed, as I'm sure you've noticed.
Raised garden beds built with untreated lumber will need to be replaced after just a few years, because the wood will deteriorate.
Cedar and heat-treated lumber will last longer, but they have a higher price tag.
There's an ongoing debate about whether or not it's safe to use treated lumber for garden beds that will be used to grow food.
In some areas of the country, termites are a concern whenever you use wood.
Gardeners in hot climates, such as where we live in Oklahoma, are sometimes concerned that metal garden beds get too hot in the extreme heat of late summer. However OLLE raised beds are coated with a zinc-aluminum alloy to reflect the sun's heat and keep the soil at a moderate temperature.
Their metal panels are made of 24-gauge galvanized steel, and are much sturdier and thicker than other raised beds on the market. They'll hold their shape without warping from the weight of the soil inside the bed.
The coated finish on the corrugated metal panels resists rust. The steel OLLE uses in their metal raised garden beds will last for decades and will still look beautiful.
I really like this sage green color, I think it will look lovely when it's full of thriving vegetable plants. There are other colors to choose from as well.
The OLLE raised garden beds look neat and tidy, and are very attractive. They are durable, resist rust, are heat-resistant, and come in a choice of colors. The top has a rubber safety edging, and of course there is no chance of getting a wooden splinter.
How to assemble an OLLE raised garden bed kit
I was so impressed with the ease of putting the OLLE metal garden bed together. In fact, I assembled this bed all by myself, and I'm no spring chicken!
The kit came in a compact, sturdy box that was easy to move out to the garden with the help of a dolly, even on a super windy, crazy hair day!
 |
| Messy hair! The wind was crazy! |
Everything I needed was included, and no power tools were necessary.
Inside the box, the panels were very well-packed, with sturdy packing materials to keep the metal panels in place.
A smaller box was nestled inside containing the instructions, the rubber safety edging, a plastic bag of screws, washers and nuts, and a wrench-like tool to use to tighten the screws.
Once I removed the panels from the box, I peeled off the protective plastic coating from each panel.
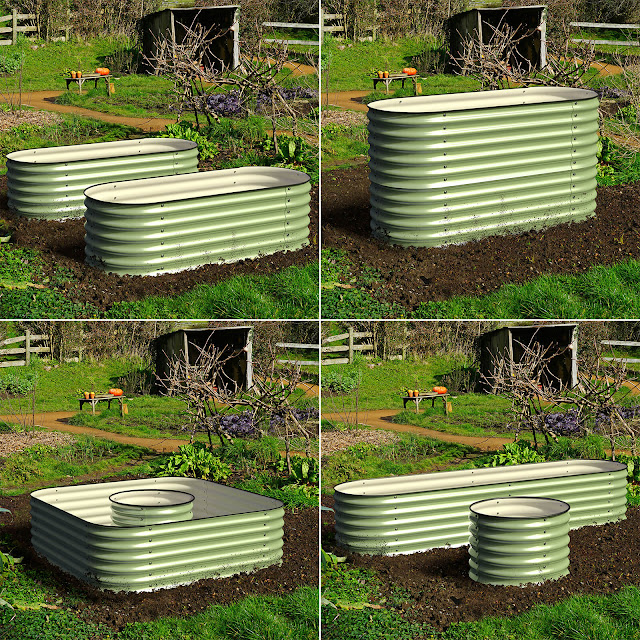
My raised garden bed kit could be assembled in one of four ways. If you wish to have a deeper bed, you can make a two-layer high bed, which would measure approximately 32" tall.
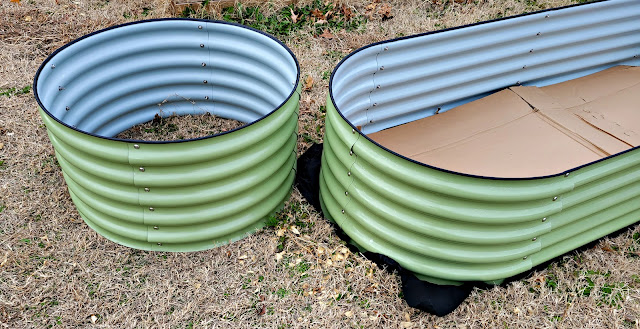
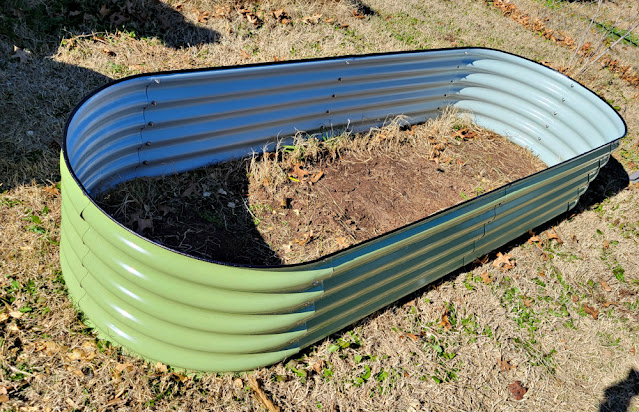
I chose to make the long oval and circle. The oval-shaped bed measures 94.5" (approximately 8 feet long) by 31.5" wide and 17" tall. The four curved panels that were left over are then assembled into a circular bed that is 31.5" in diameter and 17" high.
I'm so pleased that the width of this long oval bed is a little less than three feet wide. I know from experience that a four-foot wide bed is too wide for me to reach the middle comfortably, and that I much prefer a raised garden bed that is no wider than three feet.
I laid the panels out in the rough shape of the bed, then assembled the curved corner panels, added the side panels, and viola, the bed was done!
Yes, really, it was that simple.
Just line up two panels, add a screw, washer and nut, and repeat.
I put in the top and bottom screws first at each seam, and didn't tighten them up until later, so there was some "give" to make attaching the next panels easier.
After adding the top and bottom screws to each of the seams, I went back and added the remaining four screws at each seam (there are six screws at each seam). Then I tightened all of the nuts and screws using the provided wrench tool.
There are six longer screws included, so if you're making a two-layered bed, use these longer screws to attach the top layer to the bottom layer. These longer screws will easily accomodate the four layers of corrugated metal at each seam.
The circular bed was made in the same way.
Adding the top rubber edging
The final step in assembling the OLLE raised garden bed is to add the safety edging along the top edge. Although the panel edges are very smooth in my opinion, this edging makes the rolled metal edges even safer.
Just fit the U-shaped black rubber edging material over the top edge of the metal and push it down snugly. You'll need to wiggle it a bit when you cross the seam where two panels are joined together, but it wasn't difficult at all.
I suggest starting the edging in the middle of a panel, so that it will be easier to make a nice seam where the beginning meets the end. When you reach the end, cut the edging with a knife and butt the two ends together.
There was plenty of edging included to finish off the tops of both the long rectangular bed and the smaller circular bed with no problem. I had about eight inches of edging left over.
What to put on the bottom of a raised garden bed
Most raised garden beds are bottomless, so they just sit on top of the ground. The depth of the OLLE raised bed should keep most weeds and grass from growing up to the top of the soil with no problem.
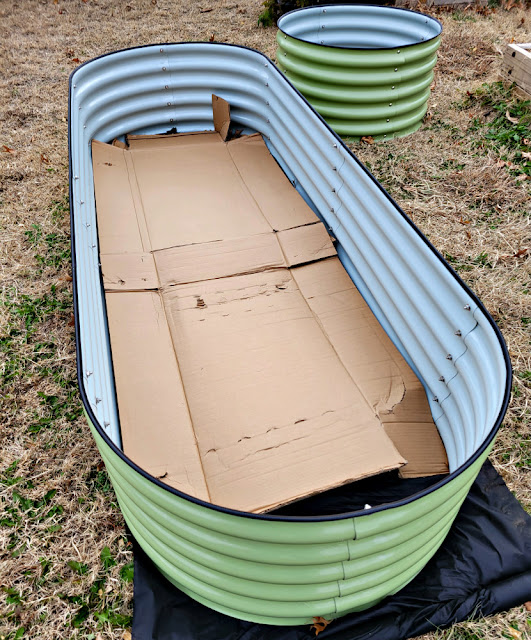
However, to prevent the Bermuda grass in our lawn from growing up through the soil in the raised bed (because it's really invasive!), I first lined the bottom of the bed with a layer of weed barrier fabric.
Next I lined the bottom of my raised bed with a thick layer of cardboard, after removing all the tape from the cardboard. I don't use shiny, coated or heavily-printed cardboard, just flattened, plain-old-brown cardboard boxes.
Earthworms love cardboard, and worms are so good for your garden's health.
In fact, the cardboard box that my OLLE raised bed was delivered in was added to the cardboard layer. How's that for recycling?
Add beautiful metal raised beds to your garden
This OLLE raised garden bed kit was so easy to put together, and it is a beautiful addition to our garden. The quality is excellent and the durable finish will look beautiful for years to come.
The 17" height of the raised bed will help keep my plants safe from the neighborhood rabbits - and deter my dogs from jumping up into the beds and digging in the soil!
To receive a discount on this or any OLLE raised garden bed, use the code OAKHILL10 when you order.
I know you'll be just as impressed with the OLLE quality as I am, and that you'll appreciate how easy it is to assemble and use these garden beds!
Related Posts:
How to assemble a kit greenhouse


