Back in January when I ordered my bees, the April pick-up date seemed very far away.
But the day finally did arrive, and hubby and I drove an hour and a half to pick up "the girls" at the home of the beekeeper who taught the class I took.
Preparing for the Bees
We prepared the Bee Yard before we picked up the bees.
Hubby mowed the meadow where the hive would be located. There were some small saplings but the brush hog took care of those. The young osage orange trees had thorns that were two inches long and extremely sharp - we cut those trees down. We also grubbed out some small cacti.
All in all, that meadow was a pretty spike-y place, and I think that the bees should be the only sharp things in the Bee Yard.
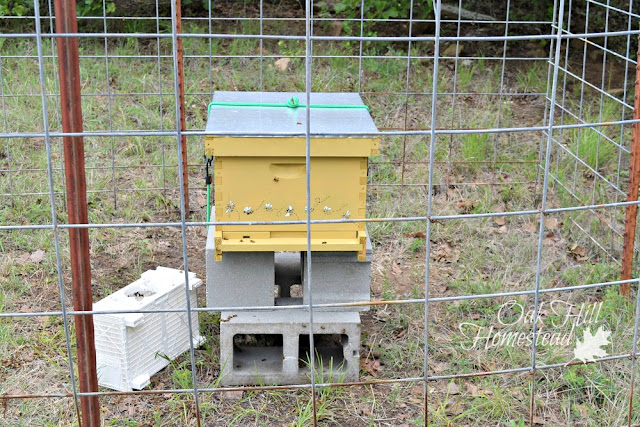
We painted the beehive using a quart of mis-tinted paint, which is often available at a much lower price. It's kind of a dijon mustard color; I can see why someone didn't want it after all, but the bees really don't care what color their house is.
I couldn't help adding something cute. I should have bought a stencil brush, but the openings were awfully small anyway and I resorted to a Sharpie and a tiny paintbrush in the end.
Next, we put up a fence around the hive site.
This is an optional thing. We don't run livestock in that spot, but the horses have been known to escape and they like the bermuda grass in that meadow.
While I'm told that cows will just move on if they're stung, horses will knock over a beehive and lick up every drop of honey, and I'd like to avoid that scenario.
The instructor at the class I took in January - I'm getting my bees from him - recommended starting with two hives, and most of what I've read in books and online say the same thing.
It's helpful to be able to compare the health of two hives. If one hive isn't doing as well as the other, you can "borrow" a frame or two of brood from the healthier hive and put it in the struggling hive.
But frankly, I can't afford two hives this year - neither the physical hive nor a second package of bees, and definitely not both - so I am praying that I'll be okay with just one and can split the hive next spring.
I've quickly learned that beekeeping is an expensive hobby, but I do see the wisdom in the advice to have two or more hives.
Picking up the bees
Finally the day arrived, and hubby and I drove two hours to pick up my package of 10,000 bees.
That sounds like a lot of bees, doesn't it? But really it's just enough to start a new hive, which will eventually, I hope, number 60,000 or more.
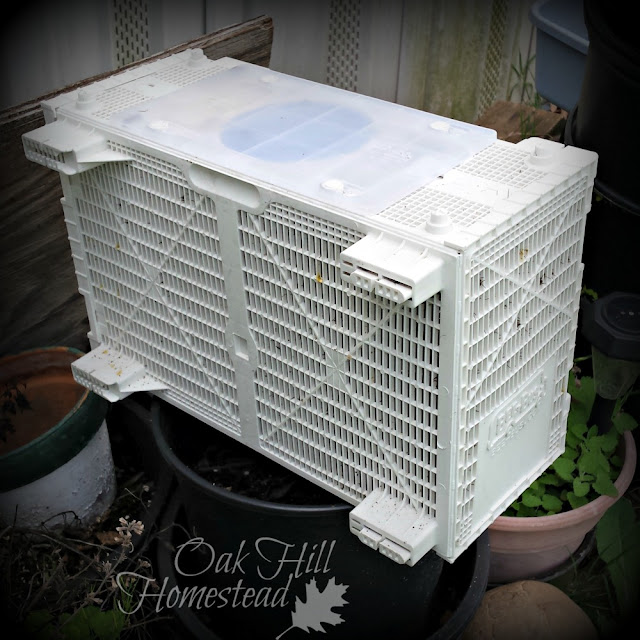
My package of bees came packed in this Bee-Bus. While I've never used one of the commonly-used wooden cages, I think this is probably a great improvement on the wooden variety.
The Bee-Bus has plastic mesh sides that are thick enough to prevent stinging through the cage. I hadn't even thought about them being able to sting through the screened side of the wooden cage. Yikes! Yes, let's use a Bee-Bus!
The Bee-Bus also provides more ventilation for the bees inside. It's easy to open, and the queen's cage is right up on top in an indentation and can be accessed from the outside, so I didn't have to pull the queen's cage out of the main cage, and I didn't have bees flying around me until I was ready to pour them in the hive.
Let's face it, I'm new to this, and I have great respect for bees.
Plus I was able to inspect the queen in her little cage before we left the beekeeper's home. There were three worker bees with her in the little queen cage.
The beekeeper told us to put the bees inside the cab of the pickup so they could benefit from the air conditioning. It was only April but it was a hot day.
Hubby was a bit nervous; he asked me to make sure the top was on the Bee-Bus securely. We made it home without incident, with the bees buzzing loudly in the back seat.
Once we were home, I set the Bee-Bus in a shady spot while I prepared to take them to their new hive.
You need to feed your new bees
This explains why you need to feed your new bees, and how to do it.
Originally I'd bought an entrance feeder for the hive, but after reading several beekeeping sites I decided it was too risky, that other bees could try to rob my new little colony.
I hadn't realized until last month that we had so many local bees, when they found one of my hummingbird feeders that wasn't snapped completely shut.
The feeder was covered with bees all day long - bees that weren't mine. So I decided than an in-hive feeder would be a better choice. I ordered this Harvest Lane feeder from Amazon that replaces one of the frames inside the hive.
Installing the package of bees
To install the bees in their new home, I followed the beekeeper's directions:
- Remove four frames from inside the hive and set them aside
- Remove the queen cage from the Bee-Bus
- Attach the queen cage to one of the middle frames with a large rubber band
- Replace the frame with the queen cage in the hive
- Remove the can of sugar syrup that was packed inside the Bee-Bus, then thump the cage on the ground to loosen the bees inside. Pour them on top of the queen cage, into the void where you removed the four frames.
- Then set the Bee-Bus near the hive entrance so stragglers can hopefully find their way into the hive on their own.
- Pour the can of sugar syrup into the in-hive feeder, then top it off with more homemade syrup.
- Finally, replace the four frames in the hive very carefully so you don't squash any of the bees. (Actually in my case I returned three frames to the hive. The in-hive feeder, aka frame feeder, took the place of that last frame.)
- Set a 2"x3" piece of pollen patty on top of the frames, and replace the hive top.
We're having a very windy spring so I strapped the top down on the hive.
Releasing the queen into the hive
Three days later (did I peek at the hive before the three days was up? Of course I did, I couldn't resist! But I only checked on them from afar. I was still a bit nervous about being stung) I opened the hive to remove the cork from the queen's cage.
After topping off the sugar syrup in the feeder, I turned my attention to the bees. They were clustered around her cage, right where they should be.
I carefully moved a couple of bees off the little cage with my gloved finger.
I had to take her cage out of the rubber band to remove the cork, and when I replaced it I moved it to another spot on the same frame just because it was easier. There were so many bees in the way!
The easiest way to get the cork out is to screw in a small screw with your fingers and then pull it out, cork and all. Sure enough, the cork popped right out.
The bees were upset when I removed the queen's cage and it was nerve-wracking to have them flying around my head and landing on me! I kept reminding myself that I was wearing "armor" (ie, my bee jacket), and they couldn't hurt me.
I stood still until they calmed down and went back to doing whatever they had been doing.
The bees have begun building comb on the frame around where her cage was, and that's exciting. They all seem to be doing exactly what they're supposed to do, as far as I can tell.
Now they'll eat the sugar candy that blocks the entrance hole to her cage where the cork was and in a few days "Queen Hazel" will emerge and rule her adoring subjects.
There's still so much to learn, but I've passed the first two tests: installing them in the hive and the first hive inspection.
And despite my greatest fears, they are still alive (and so am I). I should gain confidence as time goes by.
My next challenge will be spotting Queen Hazel in the hive on the next hive inspection. I hope I can identify her among the worker bees.
Should you get bees? Absolutely! If I can do this, so can you!
Related posts you might enjoy:
4 Tips for Ordering Bees
How and Why to Feed Your Bees
My Bees Went Crazy - How NOT to Feed your Bees


